


How to Build a Simple Spare Tire Rack for Your Overland Trip

When preparing for an extended trip, carrying the right equipment makes all the difference. On an upcoming eight-day overland ride to Newfoundland, one of the priorities was making room for a spare tire. With a few machines in the group, not everyone needs to carry one, but having at least two spares among us seemed practical.
Follow all of my trips on Kings County Adventures.
To fit the tire without sacrificing storage, I built a small rack at the rear of the machine. The idea started with the roofline and rear post. I used an angle iron to create a frame and secured it with clamps and U-bolts. The clamps were slightly oversized, so I wrapped the tube with heavy canvas tape to ensure a tight fit.
Before welding, I protected the machine with a welding blanket. A short section of angle iron was then added as a stop for the tire to rest against. Finally, I installed a U-shaped spare tire bracket in the center, which holds the tire securely with locking nuts and bolts.
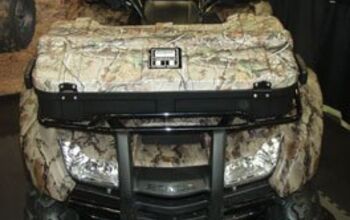
The finished rack also includes a small screened storage area underneath. This setup keeps the spare tire secure while leaving room for extra gear—useful for long days on the trail.
The ATV.com Creators Series tells stories and amplifies creators from all corners of the ATV and UTV world, including culture, adventurers, trail life, modified builds and more.
TRANSCRIPT
[Music]
0:03
Hey there, thanks very much for clicking on my video. I really appreciate it.
0:05
Where do you carry your spare tire—or do you carry one at all? Today, I’m going to talk about spare tires. Do you need one?
0:09
I’ve never carried one, and in 20 years of biking we’ve had six machines.
0:24
This summer in July, we’re going on an 8-day Overland trip to Newfoundland.
0:29
One of the things on our checklist was to make sure we had a spare tire. Since there will be two or three Teryx machines going, we don’t all need to carry extras—but we should have at least two spares between us.
0:36
To make room for everything else in my machine, I need to come up with a rack for my spare tire, along with other equipment we’ll need for this extended trip. Eight days is quite a while, and we’re really looking forward to it. Let me show you what I’ve got in mind.
The Idea
1:07
My idea starts right here—at the corner of this rear post, along the roofline, and down here at this little hole.
1:10
I’m thinking I can drop a piece of angle iron down here, then bring it over to the side and connect it to the angled tube that comes down off the roof. Maybe I can add some kind of bracket there.
Clamps
1:31
I’ve got a U-bolt here. I thought I’d just put it over the tube and attach a piece of angle iron to it.
1:36
Then I found these clamps in my little “tickle trunk”—ones I bought a while back for another project. They come in two halves, just bolt together, and I figured I could clamp them around the tube for a nice, secure job.
1:58
The only problem is they’re just a little too big for this tube. My plan is to wrap some tape around the tube to make them fit snug. That should be tight enough.
Canvas Tape
2:13
There we go—a good five or six wraps of heavy-duty canvas tape. That made it nice and tight. I don’t think it’ll ever move.
Welding Blanket
2:24
Before we do any welding or cutting on the machine, I’m going to put this welding blanket up around the edges. That way, the sparks won’t damage the paint or finish.
Installing Angle Iron
2:45
The last bit of welding I need to do is install this piece of angle iron across here.
2:51
It will act as a stop for the tire to rest against. I’ll mount it about five inches up, which should give me the right spacing. Once I weld that in, it’ll be good to go.
3:19
There we go—just about finished. I’ll pull out the last pin, take it down, clean it up, and it’ll be ready for paint.
Installing Spare Tire Bracket
3:33
The last step is installing this U-shaped spare tire bracket.
3:37
I’ll mount it right in the center where the spare will sit. This will clamp the tire securely in place, so I’ll never have to worry about it coming loose.
Mounting Spare Tire Bracket
3:51
There it is, all mounted with locking nuts and bolts. Nice and tight. Now it’s just a matter of mounting the whole setup on the machine.
4:07
I also added a little storage rack here, with some screening in the bottom. That way, we can throw in some extra gear on top of it.
4:17
Well, there it is—all fastened up. Spare tire ready to go.
Outro
4:28
Right up here is the spare tire, all set.
4:31
I hope this gives some of you with a Teryx a few ideas on how to build one of these racks, or where to mount it.
4:40
That would be great. Enjoy the rest of your day, and please consider subscribing if you like what I do. Thanks!
This article was co-written using AI and was then heavily edited and optimized by our editorial team.

My name is Buster Rogers. I've traveled halfway around the world and back many times and have seen some beautiful sites, not to mention my local lifelong adventures. I sincerely believe we, as humans, are very selfish in holding in our minds all the beauty we've seen. Therefore I want to share with everyone my adventures going well into the future as well as taking glimpses into my past. Moving forward, my intention is to capture my outdoor adventures in video and photos. I will be spending many many hours roaming Kings County, NB, Canada, along with other areas of NB, and share with those interested. My interests vary, all have one basic theme, OUTDOOR ADVENTURE. I will be Hiking. Trekking, Snowshoeing, Fishing, ATVing, Bush Crafting, Wilderness Camping, and visiting points of interest during my travels within the province of New Brunswick, Canada.


![Unique ATV Tire Bead Breaker [video]](https://cdn-fastly.atv.com/media/2022/10/24/8744118/unique-atv-tire-bead-breaker-video.jpg?size=350x220)
![Derek Guetter Crashes During Backflip [video]](https://cdn-fastly.atv.com/media/2022/10/24/8744073/derek-guetter-crashes-during-backflip-video.jpg?size=350x220)


Comments
Join the conversation